Like many, when COVID-19 hit hard and workplaces closed, I had a lot of extra time on my hands.
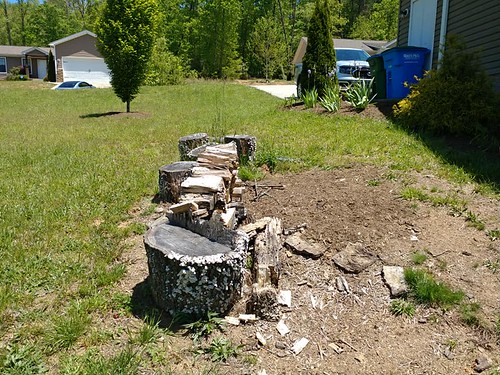
The house came with a big, dead oak tree (you can see it behind the garage).

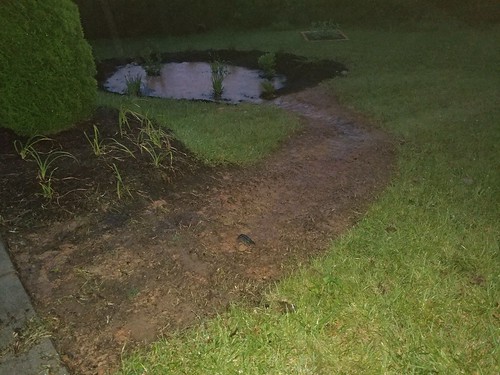
The area at the base of that tree just wouldn't grow lawn grass very well. I had a difficult time figuring out why. I eventually had the tree cut down and the stump ground out and the problem persisted, even though the process of grinding the stump spread a great deal of mulch to "fertilize" the area.
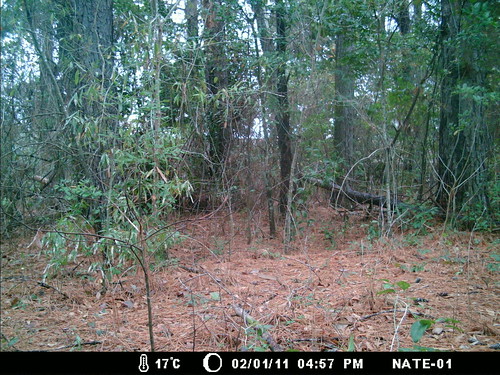
After the tree was removed, this is the area I was left with. You'll note that there's a not inconsequential slope here, as well.
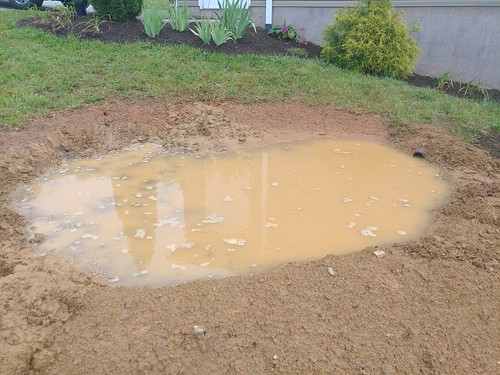
On the uphill side of the wood pile, there is a drain that comes from the downspout that you can see next to the recycle bin in the top right of the photo. I knew that this drain was an issue and for awhile, I had been planning to just extend the drain towards the back of the property (behind me) where there is a stream and retention pond. But the problem spot extended upslope from that drain. You see grass growing in the area, but the grass there was unusually sparse compared to the rest of the yard.

The breakthrough for me occurred one day while walking the dog during a long, rainy day. The area UPSLOPE from the downspout drain was extremely soggy. Something I didn't expect in an area that had more than enough slope to drain sufficiently. That set me to investigating.
I found a second drain that had been covered by grass the entire time I'd lived in the house (2 years at this point). That drain allowed water from the opposite side of the driveway to drain to this area, and contributed to the area being a bit too damp for turf grass.
How would I address that? Great question! A rain garden is a great way to address that problem! That poses another question, though. How does one build a rain garden? That will be the topic for the rest of this article.
You might be asking, "But what is a rain garden?"
Typing this question into your favorite search engine will probably turn up a definition from somewhere. Bing tells me that a rain garden is:
a garden that lies below the level of its surroundings, designed to absorb rainwater that runs off of a surface such as a patio or roof.
That's as simple a definition as I've seen. The USDA NRCS has a pdf document that gives a more lengthy explanation. Here is an EPA page with a ton of resources.
In my case, the arrangement of my yard is such that I get water draining to a place where it causes problems for growing certain types of plants. Most turfgrass doesn't like the soil extremely wet. But there ARE plants that do like to get wet, and they do awesome in a rain garden.
There are two main components to a rain garden. The first part of the rain garden is its structure. The above definition states that it lies below the level of its surroundings. You might have to dig to achieve that. In some spots, you might have an existing depression to work with. The soil plays a role here, as well. Because the rain garden needs to absorb the water, you need soil that can absorb moisture relatively well. Soil that is a very heavy clay won't absorb water very well and will need some extra work that might include amending the soil with sand, compost, and possibly even drainage structures to handle overflow.
For my own rain garden, I went with a fairly low budget option. With the COVID-19 pandemic shutting down a lot of things, I needed something that I could DIY without calling in professionals and heavy equipment.
The next big part of building a rain garden is planning where to put it and how big to make it. As for where to put it, you need to identify things to avoid. Where would it be bad for water to go? You don't want to build a rain garden only to learn later on that it's now draining its water into your basement. It needs to be far enough away from your house that it won't create foundation problems. Also keep it away from any utilities on your property.
The USDA document I linked above gives some guidelines of things to avoid:
- The garden should not be within 10 feet of the house foundation.
- Gardens should be located at least 25 feet from a septic system drainfield.
- Gardens should not be placed within 25 feet of a well head.
- Make sure to avoid underground utility lines.
- The best location for the garden will be in partial to full sun.
- Rain gardens should be constructed where the water table is at least 2’ below the surface of the soil. If you hit the water table when constructing your rain garden, consider turning it into a wetland garden.
In the US, calling 811 or visiting the Call811 website will allow you to get crews out to mark utilities on your property. Be sure to give them plenty of notice. I've noticed it can occasionally take them a few weeks. I've also had to call them out more than once before.
In my case, my septic tank and just about all of my buried utilities are on the other side of the house, or very well away from my proposed site. Also, with the slope in this part of my yard, the rain garden is located well below the foundation and several feet away. So I have that part covered. Additionally, this is a pretty sunny site. It's on the western side of the house, so it gets pretty intense afternoon sunshine. The water table is well below, as well. In other parts of the yard, I've dug all the way down to bedrock (which is about 20" deep) without hitting the water table.
How big do you make your rain garden?
This question will take a bit more work to figure out. The first step is to figure out the area that drains into it. You'll have to consider impervious surfaces (such as pavement and roof area) separately from the pervious surfaces (areas where at least some water will soak into the ground). The NRCS document I linked above, again, gives you some guidelines to follow here:
- Estimate the area that your garden will get storm water from. Multiply the width by the length of each area (driveway, sidewalk, parking area, and any other paved surface) to get square feet of each. Add each area to get square feet of the total drainage area. Remember, though, that different paved areas on your property may drain to different spots — you want to estimate only the square footage that will drain into your rain garden.
- For sandy soil, your rain garden should be 20-30% of the drainage area. For example, if the parking area and driveway measure 1200 square feet and all the rain from them will be used, your rain garden should be 20 to 30% of that, or 240-360 square feet. (ex: 10’ X 24’)
- For clay soil, your rain garden should be about 60% of the drainage area (Clay absorbs water very slowly; the varieties of rain garden plants that do well in clay take at least three years to get established. Soil replacement may be the best choice in clay soils).
- If you replace your soil with rain garden mix (50-60% sand, 20-30% topsoil, 20-30% compost) to improve your soil drainage, your rain garden should be about 20-30% of the square footage of the drainage area.
- Dig a coffee-can sized hole where the deepest part of the rain garden will be. Fill the hole with water. Mark the water level with a popsicle stick. After four hours, measure between the stick and the new waterline. For example: if the water fell one inch, then it will percolate 6 inches in 24 hours. Your rain garden should be a maximum of 6 inches deep. The results of your percolation test determine the depth of your rain garden.
Yep, you're going to need to do some math and/or calculations. I find that calculating area with maps is a little easier than doing measurements on the ground. This site describes a method to calculate areas using Google Maps. For this exercise, I think switching the view to satellite imagery makes it a little easier to calculate the area for your roof and paved surfaces. Yard area is a little trickier because you need to keep a more complicated slope in mind. The Rain Garden Alliance has a handy calculator to help you take different factors into account.
You should be at least somewhat aware of typical rainfall events in your area. Also, be aware of what a strong-but-not-too-unusual rainfall event is. For my area, rainfall events of 1" are extremely common, and events with 5" per storm occur with some regularity. Bigger events that that are not unknown, either. Because of that, I wanted to over-build my rain garden to make sure that a big rain event didn't destroy everything.
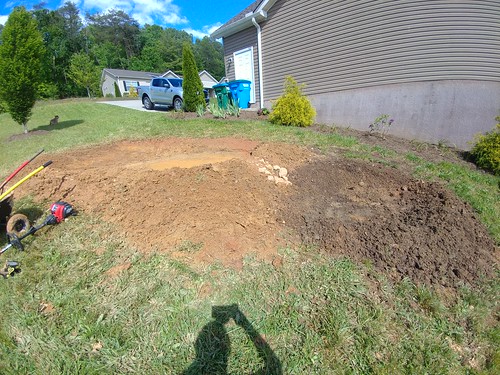
Now that we've done all the planning, it's time to head out to the site and mark out its size and location. Using your calculated estimated size and the slope of your site, do some rough estimating to get the size and shape down. You can mark things a variety of different ways. Placing sticks/rocks on the ground in the shape you want. You can use spray paint (esp a paint made for marking turf). You can use stakes and mason's line. I used a pick mattock to scrape the perimeter of the shape in the grass, and then various tools to remove the grass from the area inside. Again, using what I had to hand.

This shows a rough start where the grass has basically just been scraped away. I haven't done much digging yet, but you can see the drain from the downspout. The area just upslope from that downspout will be the deepest part of the rain garden, and you can see the beginnings of the berm that will help me to add depth. I needed the berm because I have a good bit of slope to my yard. If your yard is flat, you probably won't need one. I will be putting a spillway over that berm to help for larger rain events where my rain garden overflows. The second drain (that passes underneath the driveway) is to the left of the picture frame. I'll be addressing that part (and the water that drains off of the driveway itself) later on in the project.
I wish I had bigger tools for this project, but I just used what I had. And what I had was a Toro trimmer with various attachments. The attachment I relied heavily upon for this project was the tiller attachment. A larger tiller would have made the digging portion of this project go much more quickly.
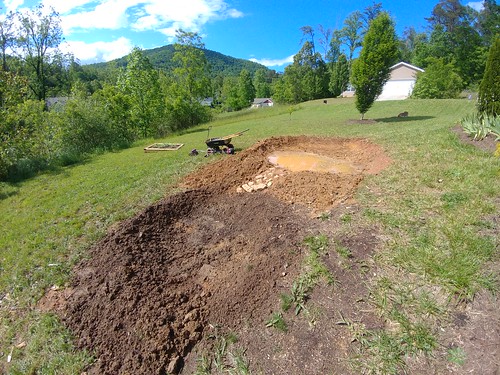
Here's some progress after a bit more digging, where you can see the berm that will help retain water begin to take shape.

After a bit more digging, I got a rainstorm that gave me the opportunity to see the concept at work. I don't remember how much rain this storm dropped, but it was enough for me to see that I needed to go bigger and deeper.
I also decided that I should built a second pool below the main one. You'll see how different the soil color is. This is because the second pool is built where that big stump had been previously ground out. That soil was very rich from the decomposed wood.
The digging process involved using the tiller to break the soil loose. In places it was very heavily compacted. The rocks you see in the small "spillway" were dug up on-site. I also needed to use a pick mattock to help break into some of that tough soil in places or to dig down more deeply where needed.
Another view that shows the area where I'm beginning to dig out the drainage from the driveway (and the drain pipe that passes underneath the driveway) at the upper right side of the depression.
I had been planning out my plant selection for some time prior to this, and everybody's plant selections are going to be different based on their location, preferences, and site-specific considerations. I am a strong advocate for native plants, so that is where I began for my plant planning.
This document from the USDA NRCS (different from the first one) gives some guidelines for selecting plants. They recommend considering plant height and shape, bloom times, bloom colors, and more as part of plant selection to help you make your rain garden an attractive part of your yard. There is also a list of native plants at the end of the document, as well as a list of plants to consider with caution. The plant list here is mostly relevant for portions of the eastern USA, so please do try to keep your geography in mind.
I used a combination of plants in containers as well as a seed mix for my area. The containerized plants gave me immediate growth and visual interest, whereas the seed mix took time to set in and added variation and a more "natural" randomized look to further growth. I obtained my plants from two main sources. The first I used for the plants in containers was Carolina Native, a greenhouse that specializes in native plants in my region. The second source I used was Roundstone Seed for the seed mixes I used. I used a wetland mix for the interior of the rain garden and a different mix for the top and back side of the berm (drier conditions outside the rain garden proper.

Also keep the moisture needs of your plants in mind when choosing where to place them within your rain garden. Plants that like more water (and can handle being submerged) can go near the deepest part of the rain garden. Plants that like drier conditions should go in shallower portions, or around the outside edge.
In this picture, I'm watering the plants after planting them. I placed the hose in the drain pipe that went underneath the driveway so I could see how the water flowed from that drain into the rain garden to help choose how I would route it from the exit of the pipe into the rain garden.

Additionally, at least in part to help with moisture management, I added a thick layer of hardwood mulch to the rain garden area. It also helps to improve soil quality as it decomposes and it looked nice when the plants were sparse early on. But most importantly, the mulch itself helped moisture management by absorbing some of the rainwater and releasing it more slowly during drier times. Your rain garden should include organic matter for similar reasons. Depending on your site, you might include mix it mulch or compost with the soil deep inside your rain garden. I did not do this with mine because it would have required a lot more digging to make the rain garden deep enough .

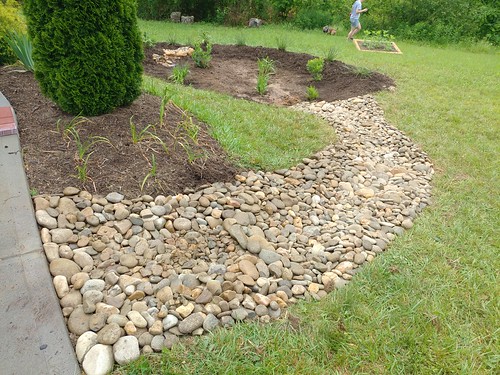
You can see the beginning of the drainage as I pull up the sod and approach the driveway.
During another mid-project rain event, checking on how I've decided to route the drainage. Here you can finally see that sneaky drain pipe that passes underneath the driveway. It wasn't strictly necessary to do this portion, but I did want to elevate the appearance of the project so it really looked nice. We get enough rainfall here that drainage becomes a problem from time to time and I wanted to future-proof, as well.
Also, take the opportunity to learn from my experience. What I did was pull up the grass, scoop out the drainage, and then place river rock to get this:
Looks great now, right?
Didn't take long before it looked like this:

I had to pull out all the rocks, lay down landscape fabric, and then put the rocks all back. It was a lot of work I could have avoided if I had placed the landscape fabric first. Weeds still try to take hold among the rocks, but the landscape fabric makes it a lot more difficult for them to root firmly. I can pull them much more easily now and keep things looking more tidy.
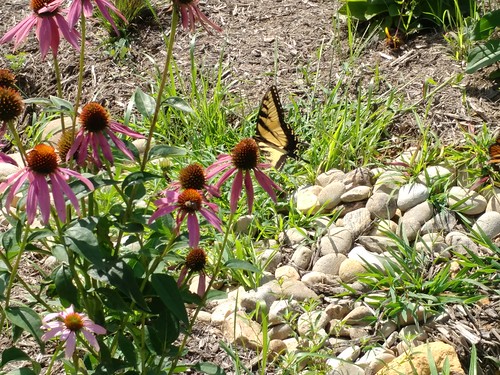
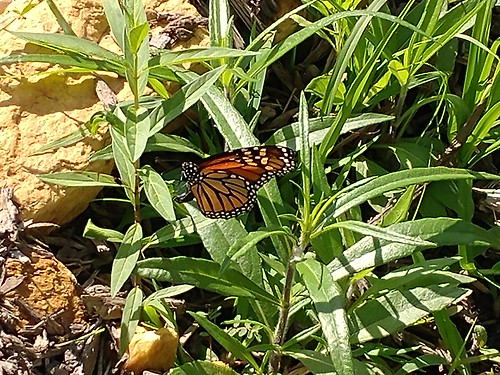
This project has been worth every second of work and expense it took. During the first year, pollinators found it to be a friendly place.

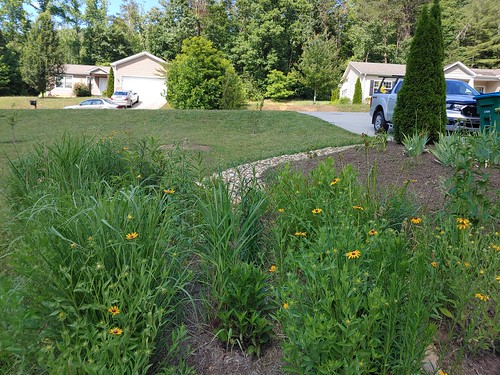
The plants really began to fill in during the second growing season.
The biggest test for the rain garden so far came on 17 August, 2021, when Tropical Storm Fred hammered the area. The rain gauge at our house recorded around 6" of rain within a single 24hr period. That was on the low end for this storm. Other parts of the region received over a foot of rain in less time, and over 3mo later, many areas are still recovering. This rain garden handled it all with no problem whatsoever. It filled up, for sure. The overflows were definitely overflowing. But I had no damage to repair afterwards. Even considering that the community has spent tens of thousands of dollars repairing damaged drainage structures and eroded areas.
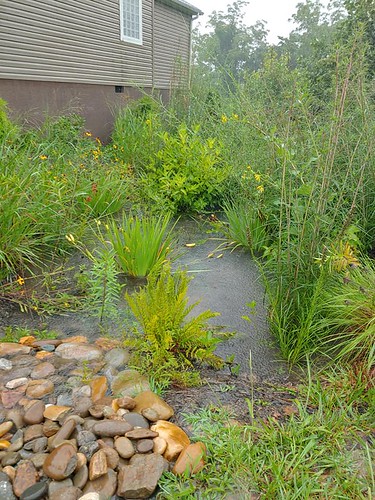
When it comes down to it, this is one of the major benefits to a rain garden. The stormwater mitigation capability of a relatively small structure is enormous. It benefits water quality. My rain garden can catch contaminants from my rooftop and my driveway, allow them to settle out, and allow cleaner water to reach the retention pond and the stream immediately downhill. Something is blooming almost constantly from March through September (late summer blooms are definitely better than early season blooms, though). In fact, the plants did so well this season that I will need to do some thinning this winter in order to keep it looking nice.